I believe that an art guitar that is not playable is not a guitar, and therefore you have failed to create an art guitar.
So, tips: Mod Podge will NEVER dry hard enough to sand it. Since sanding down the board is a very important part of the process of keeping it playable, don't use modpodge on the soundboard.
This has been a PSA
Wednesday, April 5, 2017
Monday, March 27, 2017
Greg Details
Canvas Guitars made good guitars for like two years and then disappeared entirely, so finding info on them is hard.
This bass is fucking heavy. Not joking around. I thought it was just heavy because I was lugging it around high school when I was 17, but no, it's actually heavy.
All the hardware on this is actually really nice quality.
 The thing that drives people insane about this guitar, when they see it, is that the top wasn't done in a reversed figure, so there's this chunk where the wood grain abruptly changes.
 And it goes on to the back too.
Apart from being really heavy and a sort of awkward spot on the joining at the neck that my friend one time made fun of in 11th grade, it's a really solid guitar. It's currently got flat-wound strings on it which is sort of like playing bass on the most satisfying thing ever.
The one thing to note is that while it's a totally fine volume, this bass does not get Hella Loud like you need if you're playing screamo or something. It's a bit more of a jazzy bass than a death metal bass. It's got the full 24 frets and a deep cutout for all those fun high-fret things. Super jumbo frets make it easy to play and to hear yourself articulate.
This bass weighs about the same as my harp. It's heavy, like 11lbs or seomthing
This was the first musical instrument that tiny me saved up for and bought with my own money, so I want it to go to someone who will love it. Mostly it just needs to go to someone who will play it. I just don't do that enough anymore.
This bass is fucking heavy. Not joking around. I thought it was just heavy because I was lugging it around high school when I was 17, but no, it's actually heavy.
All the hardware on this is actually really nice quality.


Apart from being really heavy and a sort of awkward spot on the joining at the neck that my friend one time made fun of in 11th grade, it's a really solid guitar. It's currently got flat-wound strings on it which is sort of like playing bass on the most satisfying thing ever.
The one thing to note is that while it's a totally fine volume, this bass does not get Hella Loud like you need if you're playing screamo or something. It's a bit more of a jazzy bass than a death metal bass. It's got the full 24 frets and a deep cutout for all those fun high-fret things. Super jumbo frets make it easy to play and to hear yourself articulate.
This bass weighs about the same as my harp. It's heavy, like 11lbs or seomthing
This was the first musical instrument that tiny me saved up for and bought with my own money, so I want it to go to someone who will love it. Mostly it just needs to go to someone who will play it. I just don't do that enough anymore.
Hannah details
Like I said, the pink s-type usually goes for about $50ish. Some people charge extra for "patent war" models, but it's not something that makes the guitar itself better. It's just a guitar that happened to be made at the same time that Fender was suing Johnson for being too similar to the Fender patent.
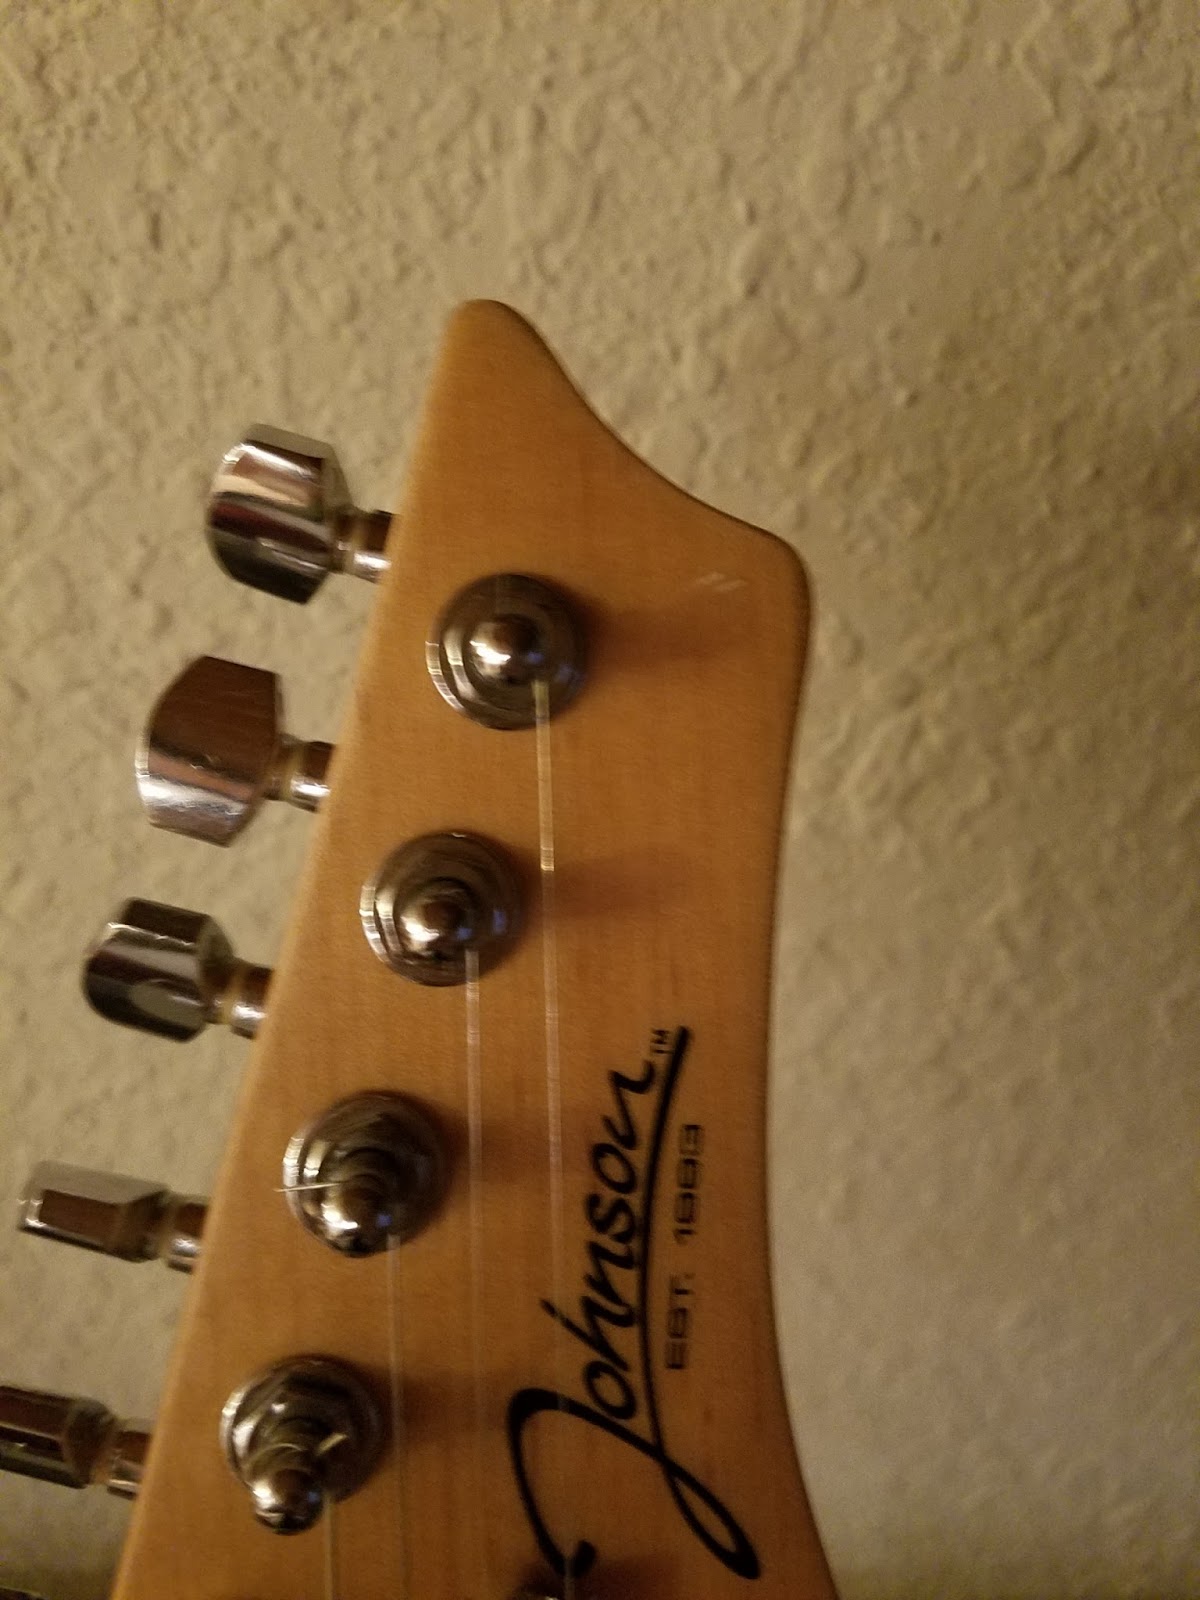
The only thing that Johnson changed after the lawsuit was the shape of the headstock.
 That chunk missing at the top is the only thing that makes this guitar a Patent War one and not a regular one. I cannot in any kind of fairness charge someone I know more for a guitar where someoneone lazily reshaped the headstock on a belt sander.
 Blue tape's there because that last fret sticks up and the high E gets stuck there while you strum. This problem can also be solved with less obtrusive tape. The butterflies and hearts come off cleanly and the neck's got the standard dot inlay underneath.
 That nut on the jack and the internal nut underneath it aren't stock. The originals fell off before I bought it, and I had to find replacements. Those replacements will not fucking fall off, made sure of it.
I don't have the trem arm or the spring that some say should go under the trem arm, but it takes stock pieces for that and last time I checked it was about $12 for the two.
 Bridge springs are in really good shape, but aren't dampened. I've never had a problem with that, but it's an easy mod.
The knobs on the front work, but they're a loose turn that "well it just doesn't feel like a fender" as a stranger once mansplained to me BECAUSE APPARENTLY I DIDN'T KNOW MY $40 BRIGHT PINK JOHNSON S-TYPE WASN'T A $1300 STRATOCASTER or something.
This is from back when Johnson used EMG pickups in their guitars instead of their shitty Johnson brand ones that are in all their guitars now.
Anyway, other than that, nothing else to disclose about it. It's a nice guitar for the quality range. Weighs nearly exactly the same as my dad's 78 Fender Strat, so just grab your nearest one of those and you'll know exactly what it feels like.
Beth's borrowed this guitar for several weeks and played it, so you can get her input if you want.
The only thing that Johnson changed after the lawsuit was the shape of the headstock.


I don't have the trem arm or the spring that some say should go under the trem arm, but it takes stock pieces for that and last time I checked it was about $12 for the two.

The knobs on the front work, but they're a loose turn that "well it just doesn't feel like a fender" as a stranger once mansplained to me BECAUSE APPARENTLY I DIDN'T KNOW MY $40 BRIGHT PINK JOHNSON S-TYPE WASN'T A $1300 STRATOCASTER or something.
This is from back when Johnson used EMG pickups in their guitars instead of their shitty Johnson brand ones that are in all their guitars now.
Anyway, other than that, nothing else to disclose about it. It's a nice guitar for the quality range. Weighs nearly exactly the same as my dad's 78 Fender Strat, so just grab your nearest one of those and you'll know exactly what it feels like.
Beth's borrowed this guitar for several weeks and played it, so you can get her input if you want.
Sunday, February 19, 2017
Bonus post: How to change a micro tank or small bowl.
I don't currently have a micro tank or a betta bowl, but I have a buttload of experience keeping betta bowls maintained (thank you, Craft Warehouse, F you, Craft Warehouse, stop selling fish. They're not craft supplies, and they're not just "product and numbers" in the words of my manager, the words that made me quit that job).
Big big big, important note: different fish have different needs. It is possible to keep a betta fish in a bowl larger than a gallon without negatively impacting their life. It is not possible to keep a goldfish in a bowl without making the fish really sick and cutting its lifespan in half. This post does not apply to any fish other than betta fish.
You're going to run into people who say you can't keep betta fish in bowls. Most of them have never tried, and they're just parroting information they hear on the internet. I, personally, get more enjoyment out of watching fish who have swimming space and a low-stress life, so I keep my fish in larger tanks. However, if you've decided that you want to keep a fish in a bowl, I think it's important to have some useful and correct information out there.
The first thing I want to say, though, is that I have maintained a lot of fish in a lot of fish in bowls ranging from .5 to 2.5 gallons, and I do not think it is possible to meet a betta fish's survival needs in a bowl or tank smaller than one gallon. The difference in fish health between living in 1.5 gallons versus living in 0.75 gallons is easily visible.
If you've already got a 0.25 gallon betta cube and you want to keep something in it, look into planaria, the only pet you can cut in half to make two of them. Other great pets for a betta cube include m&m's and plastic dinosaurs.
I'm going to be kind of harsh here. In a bigger tank, you get a little more flexibility with what you want to do, and you get a little more flexibility with how you want to care for it. When you've moved your fish down to the smallest container possible for it to stay alive, you need to be ready to provide everything you need to keep it alive.
First, if you're doing a betta bowl or a micro tank (tank under 2.5-3 gallons), you need certain things when you set it up:
So, you've got your bowl set up? Good. Now, it's time to clean it.
And there you go. Sorry for no pictures, but I'm not at a point in my life right now where my lifestyle gives me enough free time to maintain a high-maintenance thing like a micro tank, so I couldn't take any.
Take care of your fish, and they'll make you happy.
😃
Big big big, important note: different fish have different needs. It is possible to keep a betta fish in a bowl larger than a gallon without negatively impacting their life. It is not possible to keep a goldfish in a bowl without making the fish really sick and cutting its lifespan in half. This post does not apply to any fish other than betta fish.
You're going to run into people who say you can't keep betta fish in bowls. Most of them have never tried, and they're just parroting information they hear on the internet. I, personally, get more enjoyment out of watching fish who have swimming space and a low-stress life, so I keep my fish in larger tanks. However, if you've decided that you want to keep a fish in a bowl, I think it's important to have some useful and correct information out there.
The first thing I want to say, though, is that I have maintained a lot of fish in a lot of fish in bowls ranging from .5 to 2.5 gallons, and I do not think it is possible to meet a betta fish's survival needs in a bowl or tank smaller than one gallon. The difference in fish health between living in 1.5 gallons versus living in 0.75 gallons is easily visible.
If you've already got a 0.25 gallon betta cube and you want to keep something in it, look into planaria, the only pet you can cut in half to make two of them. Other great pets for a betta cube include m&m's and plastic dinosaurs.
I'm going to be kind of harsh here. In a bigger tank, you get a little more flexibility with what you want to do, and you get a little more flexibility with how you want to care for it. When you've moved your fish down to the smallest container possible for it to stay alive, you need to be ready to provide everything you need to keep it alive.
First, if you're doing a betta bowl or a micro tank (tank under 2.5-3 gallons), you need certain things when you set it up:
- A bowl that is as big as you can physically pick up and move around when it's full. It needs to hold a gallon or larger, or it's too small for the fish. If it's too heavy for you to move, you're never going to clean it on a regular schedule. If you can't find a bowl that's over a gallon, but light enough for you to move, either get a lighter bowl and a lighter decor, or get a 5-gallon and a filter. I cannot stress enough that it is actually much easier to maintain a 5-gallon tank than it is to maintain a small bowl. Less stress on you, less stress on your fish.
- A heater that you trust. Before you buy a heater, look up reviews of it. There's some heaters marketed especially for bowls that overheat and kill fish. The less water you have, the more quickly an overheat will kill someone. The basic rule is the less water you have, the less room you have for things to go wrong. Your heater needs to keep the tank at roughly 78 degrees. A small bowl or tank is going to be colder than the room temperature, and very likely to get too cold if you turn the heating off or the air conditioner on. You can't let your room regulate your temperature. You need to heat it yourself.
- NO FILTER. That's right. Unless it's three gallons or larger, no filter. Look back to #2 and read that bold text again. Betta fish have an adaptation that allows them to live in a higher ammonia environment than most other fish. They don't have that same resistance to nitrite. Nitrite is also, on its own, more toxic than ammonia. If you don't have enough water in your tank, your cycle will crash, and it will make nitrite. Among the many things that a filter does, it makes it easier for you to take care of a mini ecosystem in your tank. If you want a micro tank or a betta bowl, you need to be ready to change the water once or twice a week. Once again, a bowl is harder to maintain than a 3-5 gallon tank.
- Easy to remove, easy to clean substrate. The poop goes into the gravel, and you're going to have to get it out. My favorite substrate for a bowl is glass rocks or marbles. You want the ones that are the diameter of a quarter, or smaller. If you want big rocks, you need small rocks to fill in the gaps, because for some reason betta really like to get stuck under rocks. They like getting stuck. They don't really like the subsequent death. Whatever rocks you use, you need to be able to take them all the way out and wash them off, and wash the bowl out. You can use gravel and a strainer, if you want. You can also have just a bare bottom of your tank. That's all up to you, but you need to be able to remove all of your substrate and wash it. Sand is really bad for betta bowls.
- Enough places for your betta to hide. Being in a small, clear bowl does not make your fish feel any less exposed than being in a large, empty tank. Betta need some form of cover, or they get stressed out and more vulnerable to sickness. You need a cave they can't get stuck in Flower pots that are unglazed or glazed with non-metallic high-fire glaze work well if you lay them on their sides. Plants that can't scratch them and that won't rot in the water are a good thing, too. I like weighted silk plants.
- Nothing else polluting their water. Live plants are pretty, but live plants in a bowl do not filter the bowl. Live plants in your betta bowl may make the conditions in the bowl much worse. Plants do not filter your water. PLANTS DO NOT FILTER YOUR WATER. Lucky bamboo and peace lilies are both land plants, and they need to have their leaves exposed to the air. All live plants can have parts that die, break off, and rot. When you clean your bowl or microtank, you're going to take everything that's in it, out. This can stress out the plant and make roots break off, or just make your plant die. Dead plant bits are just adding to the shit you have to clean out of the tank.
- Food and respiration space. Betta fish need to take gulps of air from the surface of their water. It feeds their labyrinth organ, which is sort of like a lung. This is the adaptation that helps them live in higher ammonia environments than some other fish. If they can't get air from the surface, they die. The surface of their water needs to be mostly clear, with space to allow oxygen to reach the surface. This means that, while pretty, putting a peace lily on top of a betta bowl is a bad idea. Also, betta fish don't live off the roots of the peace lilies in the plants. They're carnivores. If you've seen a betta in a peace-lily-on-top setup biting at the roots, it's usually because it's starving to death and willing to try anything. A betta's body is unable to eat and get nutrients from plant roots in the same way our body isn't able to eat and get nutrients from plastic soda bottles. You need to give your fish actual food made from actual meat.
So, you've got your bowl set up? Good. Now, it's time to clean it.
- Grab your ammonia test kit (YOU NEED AN AMMONIA TEST KIT. It really doesn't matter if it's expensive and you don't want to spend that much money. Trying to maintain a bowl without owning an ammonia test kit, "because it's expensive," is like trying to store food in a refrigerator that isn't plugged in "because electricy costs a lot." Someone's going to get sick because of what you're doing and they're going to die). Do a test on your water. If your ammonia is above .5ppm, you know that it's been too long since your last water change. You need to do a water change when your ammonia goes above 0.5 OR when you see crap accumulating on the bottom OR once a week, whichever comes first. After a while of testing, you're going to have a good idea of when you need to change your water, but you should still do a test before each change. As your fish grows up, gets healthier, gets sicker, water gets warmer, water gets cooler, the ammonia production will change.
A good rule to go by: If you tested your water and it was 1ppm, and you haven't done a change for 12 days, you should change your water and check it again in 6 days. If you test your water 6 days later and your ammonia is below 0.5ppm, you need to do your next change in 6-7 days. Your ammonia test will give you an exact answer for the question of how many days should you go between changes. - Cup your fish. You can use the cup you got him in, or any other clean cup that you save for that purpose. Get him out of the bowl and put him somewhere where you can keep an eye on him, won't knock him over, and where the cat won't see him.
- Unplug your heater. You can let it cool for about half an hour, or grab another cup full of water and stick the heater in that to cool off while you clean the bowl.
- Take the whole bowl to the sink of your choice. Scoop out some water first, if you need to. You can also use the bathtub if you don't like using a food sink. You can use your garden hose outside if you don't like using your bathtub.
- Pull out your castles and plants and other things and set them aside.
- Use a bucket or a large bowl or a colander that you use only for fish, and pull all your substrate out. Try to get as much rocks and as little water as you can. Dump the rest of the water out of the bowl.
- Do not use soap on anything at all. No soap. Don't even wash your hands with soap until you've finished the whole change and made sure your fish buddy's okay.
- Rinse out the bowl. Using a paper towel or your hand, wipe the inside of the bowl to get any extra gunk out, and then rinse it again.
- Rinse off the rocks and all your decoration. Grab your now-cooled heater and rinse that off as well.
- Fill the bowl halfway with water that's roughly the same temperature as the temperature in the cup your fish is in. If your heater goes under your rocks, put it in place. Don't just dump all the rocks into an empty glass bowl, or you can break it. You can do it a handful at a time, or fill up the bowl some of the way before dumping the rocks in.
- Either decorate the bowl the way you usually do, or take the bowl to where it lives, and then decorate it.
- Fill the bowl up all the way. Match the temperature of the water to the temperature of the cup your fish is in. Put conditioner into your water. (I like to fill the bowl with tap water, and then put the conditioner in. I like to pretend that the chlorine in the water kills some of the remaining bacteria in the bowl. I objectively know it doesn't, but it makes me feel good and it doesn't hurt anything)
- Put your fingers over the top of his cup like a screen, and dump all the water out of the cup without dumping the fish out. Immediately dump the fish into the bowl. This makes sure that you don't add high-ammonia water back into the bowl.
- Look at your fish and tell him he's pretty. Watch for a couple minutes to make sure he's breathing okay. If his breathing is very labored and doesn't settle down after two minutes, take him out and figure out how a toxin could get into his water. Change all the water again.
And there you go. Sorry for no pictures, but I'm not at a point in my life right now where my lifestyle gives me enough free time to maintain a high-maintenance thing like a micro tank, so I couldn't take any.
Take care of your fish, and they'll make you happy.
😃
A tale of three betta water changes, #1, when it's all right
I did the legendary Triple Water Change Extravaganza today, and all three tanks that I have ended up being very different. Since I know some folks have questions about when do I have to water change, why do I have to water change, how much do I have to water change, and all the rest, time for not one, not two, but three blog posts about changing water.
Those of you who don't keep up with my many betta fish (HOW DARE YOU) might not remember little Cinco, the fish who can't swim (and also isn't all that small).
Cinco is in a 5 gallon tank with a highly restricted sponge filter. He has a submersible, adjustable, 25w glass heater.
So, first question: Why do I have to water change?

Your water tests tell you how much water you need to change.
(If the cycle's going really well, there shouldn't be an ammonia reading at all. The fact that there was ammonia means that I need to move the filter up a notch to get more water going through it)
Even if your water tests are below maximum, if it's water change day, it's a good idea to change enough of the water to vacuum your gravel. Poop falls in there and you don't want him living in poop, bro.
While you're doing those water tests, unplug your heater and filter. Changes are easier if you turn those off.
 (Say hi to my mom, accidentally photobombing the tank here.)
After your water tests, take some time to look at your fish. Really look at him. You need to know what your fish looks like, so that you can notice if anything changes. Keep an eye on things that concern you.
If your fish gets sick, it's important to know if that shiny spot on their back is a tumor they've already had or a rapidly-developed columnaris saddle. Fish that are sick usually are sick before they start acting sick. The key to keeping your fish healthy is to notice that they are looking or acting differently before they start looking or acting sick. My fish Casper had a tumor on his back that grew slowly, but ended up the size of an edamame bean. Keeping an eye on him, how it was growing, and how it was acting, let me know when it was starting to affect his quality of life.
Also, if I saw another fish lie on the bottom or lie flat on decorations like Cinco does, I would immediately think that they were sick. Because I know Cinco, however, and I keep a close eye on all his traits and behaviors, I can use other things to judge if he's feeling sick.
If you're new to betta fish or if you like lists, you can keep a journal for your fish. Every time you change the water, you can write down temp, test results, what size water change you did, and the state of the fish's eyes, fins, body, movement, breathing, and iridescence. This is handy to look back on when you think something isn't right.
Step two of the water change is to take water out of the tank and put it in a bucket. If your tank isn't small enough for you to safely pick up and move to a sink, look into getting a siphon.
Quick note: Even if you let your filter and heater cool, try to keep the heating element under water. If you put your heater horizontally near the bottom of the tank, you can drain almost all the water out without it reaching the air.
Siphons use gravity to suck the water out of the tank. While they're sucking the water out, they can also suck crap out of your gravel.
To vacuum all of the gravel, I ended up draining about half the water. If I had a smaller siphon, I could do it in less, but I only want to own one siphon. This is the medium size.
You can use the siphon to vacuum pea-sized gravel and small glass stones by just shoving it into the gravel to suck some of it up into the siphon, and then picking it up to let the gravel out. It lets the gravel down but keeps the fish poopies in your bucket. You just repeat that process until you've vac'd all the gravel.
If your tank is bare, or has sand, you can just hover it over the bottom and it'll pick it up. Some people argue that this makes bare tanks or sand tanks safer, but I disagree. That's for a later post.
Step three of your water change is to use the water in your bucket to water your household plants. The water from your water change has an elevated nitrate level. Nitrate's good for plants. You don't have to waste water. The sea pig gets a fish in its butt. Everyone wins.
Once that's done, dump the rest of the water and fill the bucket up with new water.
 Make sure it's within a few degrees of the temperature of your old water. Pull your thermometer out of the tank and use it to check, if you need to.
All the water in betta fish range should feel slightly warm when you feet it with your fingertips, and slightly cool when you feel it with the inside of your wrist.
You're going to need to put water conditioner into your water, to remove chlorine, chloramine, and heavy metals (unless you're awesome, like me, and get all of your water from your private well and control every aspect of it and are 100% sure it has nothing in it).
My favorite water conditioner is Seachem Prime. It's pretty intensely concentrated, so you only need two drops per gallon to remove chlorine and its friends.
Prime's also handy for if your cycle crashes, but you can't do a change right then, because it temporarily detoxifies ammonia and nitrite. Just follow the directions on the bottle.
However, almost all water conditioners have nearly the same ingredients. Anything that says, "removes chlorine, chloramine, and detoxifies heavy metals," will do the job. I have never run into a water conditioner that doesn't work.
Water conditioner is slightly different from dechlorinator. Dechlorineator removes chlorine, but not chloramine or heavy metals. Most municipalities use chloramine instead of chlorine, so dechlorinator doesn't do all that much.
You hear stories of leaving the water to sit overnight and the chlorine evaporates. This is. Well. Uh. If we were in like 1970, yes? If you leave the water out for about a week, the chlorine evaporates. The chloramine doesn't. The heavy metals don't. It takes a long time. Aquasafe is $2 a bottle. Just get some.
Water conditioner works almost instantly. Drip it in the bucket, give it a stir or let it sit for a few seconds, and you're good. If you're adding water conditioner to the bucket, dose enough for the number of gallons in the bucket. If you're adding to the tank before you add your water, dose enough for the whole capacity of the tank.
If I had a 20-gallon tank and I was adding 5 gallons of water, I'd add 5 gallons worth of conditioner to the bucket, or 20 gallons of conditioner to the tank.
It's safe to go a little bit over on water conditioner. An extra few drops won't hurt the fish, though it also won't make the tank any better.
 So, now you need to get the water from your bucket, into your tank. I am not a super strong lady, and a lot of the time I can only barely lug 5 gallons of water around the house. I used to have a pitcher for scooping the water up, but it was too small and I got tired of it. Now I use a milk jug that I sawed the top off with a steak knife. It was easy, and fun!
Any time you use something for your fish, before you use it the first time you need to wash it extremely carefully in hot water, with no soap, and a lot of abrasion. You don't want to dump milk into your tank. My milk pitcher lives in my fish bucket with my water change towel. I use the towel to cover the space between my bucket and the tank, to catch drips.
After a couple of scoops into the tank, I can usually pick up the bucket and dump it in. When you dump, be careful to not dump on the fish. It scares the poor boys.
Cinco already can't swim, so pushing him around with water really upsets him and might hurt him.
I usually aim all my pours on the top of a decoration. If it hits the top of a cave instead of the gravel, it disperses the water and gravel doesn't go flying everywhere. This is especially handy if you're using sand instead of gravel.
Then it's just a quick rearranging of the decorations that might have gotten knocked out of place during the process, and a check on the fish, and you're done! Just time to put everything away.
And there you go, how to do a water change when there's nothing wrong with the tank.
Just remember, test the water, look at the fish, then change the water. Easy, easy.
Those of you who don't keep up with my many betta fish (HOW DARE YOU) might not remember little Cinco, the fish who can't swim (and also isn't all that small).
Cinco is in a 5 gallon tank with a highly restricted sponge filter. He has a submersible, adjustable, 25w glass heater.
So, first question: Why do I have to water change?
- If your tank has a filter, your water change is largely to remove nitrate generated by your nitrogen cycle
- If your bowl does not have a filter, your water change is to remove ammonia generated by your fish
- You also remove solid wastes from the water while you change the water
- If your cycle failed, you need to do a water change to remove other toxins that build up
- If something bad gets into your tank (toxin, disease, or other), you might need to do an emergency 100% water change with cleaning. This is different from today's water changes.
- When you need to change the water is determined by a lot of things. Some tanks need it once every two weeks or once every week. A small 1-gallon bowl or a tank with a broken/forming nitrogen cycle may need it twice a week.
- I can't tell you exactly when you need to do water changes. On the other hand, you can buy a thing that can tell you exactly when you need to do water changes. Go out and get yourself an accurate test kit for freshwater. I like API's liquid tests. They're easy to do and easy to read, and have a reputation for being accurate.
- If you have fish, you need a test kit. This is important. Trying to take care of a fish without a test kit is like trying to drive your car if you have 3" of snow on all your windows. You can't tell what you're doing, and you're going to kill someone because of it.
- If you have a tank with a filter, you need a test for ammonia, a test for nitrite, and a test for nitrate. If your tank does not have a filter, you only need a test for ammonia. Your bowl won't produce any nitrite or nitrate.
The first thing you're going to need to do is to run a water test. This is the first step of doing the water change. Without this, you can't tell if you had a surprise spike in the system, and you might change too little water. Living in fucked up water makes your fish weaker, which means if they get sick, they're going to die of a disease a healthy fish could fight off.
For some reason, I don't have a picture of all three tests, but his nitrite was zero, ammonia was below .25ppm, and nitrate at about 20


Your water tests tell you how much water you need to change.
- If your ammonia is above .25, you need to do a change big enough to get it under .25
- If your nitrates are above 20, you need to do a change big enough to get it at 20 or below
- If your nitrite is anything, you need to get that level down to where it doesn't register on your test at all. This is usually 80%-100% of the water.
(If the cycle's going really well, there shouldn't be an ammonia reading at all. The fact that there was ammonia means that I need to move the filter up a notch to get more water going through it)
Even if your water tests are below maximum, if it's water change day, it's a good idea to change enough of the water to vacuum your gravel. Poop falls in there and you don't want him living in poop, bro.
While you're doing those water tests, unplug your heater and filter. Changes are easier if you turn those off.
 (Say hi to my mom, accidentally photobombing the tank here.)
 After your water tests, take some time to look at your fish. Really look at him. You need to know what your fish looks like, so that you can notice if anything changes. Keep an eye on things that concern you.
If your fish gets sick, it's important to know if that shiny spot on their back is a tumor they've already had or a rapidly-developed columnaris saddle. Fish that are sick usually are sick before they start acting sick. The key to keeping your fish healthy is to notice that they are looking or acting differently before they start looking or acting sick. My fish Casper had a tumor on his back that grew slowly, but ended up the size of an edamame bean. Keeping an eye on him, how it was growing, and how it was acting, let me know when it was starting to affect his quality of life.
Also, if I saw another fish lie on the bottom or lie flat on decorations like Cinco does, I would immediately think that they were sick. Because I know Cinco, however, and I keep a close eye on all his traits and behaviors, I can use other things to judge if he's feeling sick.
If you're new to betta fish or if you like lists, you can keep a journal for your fish. Every time you change the water, you can write down temp, test results, what size water change you did, and the state of the fish's eyes, fins, body, movement, breathing, and iridescence. This is handy to look back on when you think something isn't right.
Step two of the water change is to take water out of the tank and put it in a bucket. If your tank isn't small enough for you to safely pick up and move to a sink, look into getting a siphon.
Quick note: Even if you let your filter and heater cool, try to keep the heating element under water. If you put your heater horizontally near the bottom of the tank, you can drain almost all the water out without it reaching the air.
Siphons use gravity to suck the water out of the tank. While they're sucking the water out, they can also suck crap out of your gravel.
To vacuum all of the gravel, I ended up draining about half the water. If I had a smaller siphon, I could do it in less, but I only want to own one siphon. This is the medium size.
You can use the siphon to vacuum pea-sized gravel and small glass stones by just shoving it into the gravel to suck some of it up into the siphon, and then picking it up to let the gravel out. It lets the gravel down but keeps the fish poopies in your bucket. You just repeat that process until you've vac'd all the gravel.
If your tank is bare, or has sand, you can just hover it over the bottom and it'll pick it up. Some people argue that this makes bare tanks or sand tanks safer, but I disagree. That's for a later post.
Step three of your water change is to use the water in your bucket to water your household plants. The water from your water change has an elevated nitrate level. Nitrate's good for plants. You don't have to waste water. The sea pig gets a fish in its butt. Everyone wins.
Once that's done, dump the rest of the water and fill the bucket up with new water.

All the water in betta fish range should feel slightly warm when you feet it with your fingertips, and slightly cool when you feel it with the inside of your wrist.
You're going to need to put water conditioner into your water, to remove chlorine, chloramine, and heavy metals (unless you're awesome, like me, and get all of your water from your private well and control every aspect of it and are 100% sure it has nothing in it).
My favorite water conditioner is Seachem Prime. It's pretty intensely concentrated, so you only need two drops per gallon to remove chlorine and its friends.
Prime's also handy for if your cycle crashes, but you can't do a change right then, because it temporarily detoxifies ammonia and nitrite. Just follow the directions on the bottle.
However, almost all water conditioners have nearly the same ingredients. Anything that says, "removes chlorine, chloramine, and detoxifies heavy metals," will do the job. I have never run into a water conditioner that doesn't work.
Water conditioner is slightly different from dechlorinator. Dechlorineator removes chlorine, but not chloramine or heavy metals. Most municipalities use chloramine instead of chlorine, so dechlorinator doesn't do all that much.
You hear stories of leaving the water to sit overnight and the chlorine evaporates. This is. Well. Uh. If we were in like 1970, yes? If you leave the water out for about a week, the chlorine evaporates. The chloramine doesn't. The heavy metals don't. It takes a long time. Aquasafe is $2 a bottle. Just get some.
Water conditioner works almost instantly. Drip it in the bucket, give it a stir or let it sit for a few seconds, and you're good. If you're adding water conditioner to the bucket, dose enough for the number of gallons in the bucket. If you're adding to the tank before you add your water, dose enough for the whole capacity of the tank.
If I had a 20-gallon tank and I was adding 5 gallons of water, I'd add 5 gallons worth of conditioner to the bucket, or 20 gallons of conditioner to the tank.
It's safe to go a little bit over on water conditioner. An extra few drops won't hurt the fish, though it also won't make the tank any better.
 So, now you need to get the water from your bucket, into your tank. I am not a super strong lady, and a lot of the time I can only barely lug 5 gallons of water around the house. I used to have a pitcher for scooping the water up, but it was too small and I got tired of it. Now I use a milk jug that I sawed the top off with a steak knife. It was easy, and fun!
Any time you use something for your fish, before you use it the first time you need to wash it extremely carefully in hot water, with no soap, and a lot of abrasion. You don't want to dump milk into your tank. My milk pitcher lives in my fish bucket with my water change towel. I use the towel to cover the space between my bucket and the tank, to catch drips.
After a couple of scoops into the tank, I can usually pick up the bucket and dump it in. When you dump, be careful to not dump on the fish. It scares the poor boys.
Cinco already can't swim, so pushing him around with water really upsets him and might hurt him.
I usually aim all my pours on the top of a decoration. If it hits the top of a cave instead of the gravel, it disperses the water and gravel doesn't go flying everywhere. This is especially handy if you're using sand instead of gravel.
Then it's just a quick rearranging of the decorations that might have gotten knocked out of place during the process, and a check on the fish, and you're done! Just time to put everything away.
And there you go, how to do a water change when there's nothing wrong with the tank.
Just remember, test the water, look at the fish, then change the water. Easy, easy.
Subscribe to:
Posts (Atom)